.png?height=120&name=MicrosoftTeams-image%20(6).png)
This article helps admins set up swag items as welcome gifts for new hires, streamlining the onboarding process. It explains how to easily configure and assign rewards, creating a welcoming and efficient experience for new employees.
Login to JobPts -> Admin Center -> Celebrations -> Manage New Hires
A "Create Service New Hire" button will be available at the top of the page. Clicking this button will allow admins to easily create new Service New Hire events.

Image: Manage New Hires Page
Events can be created based on specific criteria such as country, company code, or organizational unit, or any combination of these. The displayed fields will be prepopulated only for the selected criteria.
For instance, if an event is created for employees in Australia, the Country column will show Australia. Similarly, if an event is defined for US employees under a specific Company Code, the relevant columns will be populated, while others will remain blank.
- Country - Displays the country for which the event has been created. If no country-specific criteria are defined, this column will remain empty.
- Company Code - Shows the company code for which the event applies. This field will remain empty if the company code is not specified in the event criteria.
- Org Unit - Shows the organizational unit included in the event. If no organizational unit is defined, this column will be empty.
- Modified By - Displays the name of the last person who modified the event.
- Modified Date -This column shows the date when the event was last updated or modified.
- Actions - Contains options to Edit or Delete the event. No limitations here on when and what can be edited, nor deleted.

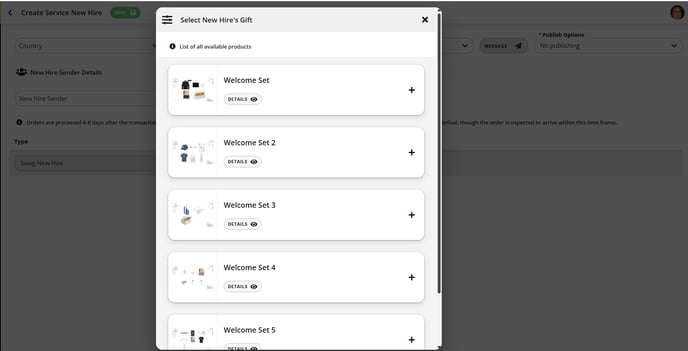
Image: Create Service New Hire
Publish Options

Image: Publish Options
-
No Publishing – This is the default setting, meaning the received transaction will not be shared on the social wall.
-
Automatically Publish – Awards of this type will be posted on the social wall automatically.
-
User Preference – This means the user can choose to publish their award, and it will be found in the "Awards for Publishing" page.
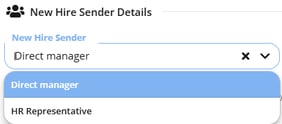
- Direct Manager – This option allows you to designate the recipient's direct manager as the sender of the transaction.
- HR Representative – This option enables you to select any individual from a dropdown menu, allowing any user to be chosen.


Application
Once the new hire configuration is applied, the employee will receive an in-app notification about the item they have received.

Image: In-App Notification for the received welcome gift
When notification is clicked, it will redirect to the 'Received Recognition Details' page under "My Awards" tile.

Image: Received Recognition Details page for New Hire