On this article, we will go through the new interactive Moments that Matter page which is designed to create an interactive and engaging celebration experience for all users.
JobPts has a brand new layout for celebrating moments, designed to create an interactive and engaging experience for all users. With our latest release, we've added exciting new features to enhance the way you and your team celebrate milestones, accomplishments, and special occasions. In this article, we'll take a closer look at the new interactive layout and explore all the ways it can help you create a fun and memorable celebration experience for your team.
To start, login to JobPts and open the Celebrations tile.
Log in to JobPts -> Celebrations
The main page is divided into several segments.
The first part displays all of the available filters for you to customize your view. You can search the moments by a specific user, event type and apply one of your company filters such as global, country, organization and my team.
*Note: The My Team filter is only visible to managers, it displays a list of moments that only includes the members belonging to the manager's team.
*Note: Managers can view events from their department, team, and direct reports.
Right next to it, you will be displayed the events that were active for the past 7 days.

Image: JobPts application - Moments that matter overview
For the example below, we've applied two filters, New Home for event type and Country for the main filter. The final output is applied for all events.

Image: JobPts application - Moments that matter filter
Moving below, the page is divided in several segments:
- Today's Celebrations
- Upcoming Events
- Past Events
For all of the above events, you will be listed all of the birthdays and anniversaries for the colleagues. This process is automated and all of the events will be automatically created.
In order to change the view to Calendar mode, click on the Calendar icon right next to the View Options toggle button.

Image: JobPts application - Moments that matter calendar view
In both List and Calendar mode, you are able to select any event displayed in order to view the event details such as the context and date of the event, as well as to send a personal message to the person.
If you slick on the Congratulate button, you will be taken to the next screen where you can enter your appreciation message.

Image: JobPts application - Moments that matter message
After you've sent the message, you will be displayed the confirmation window below.

Image: JobPts application - Moments that matter message confirmation
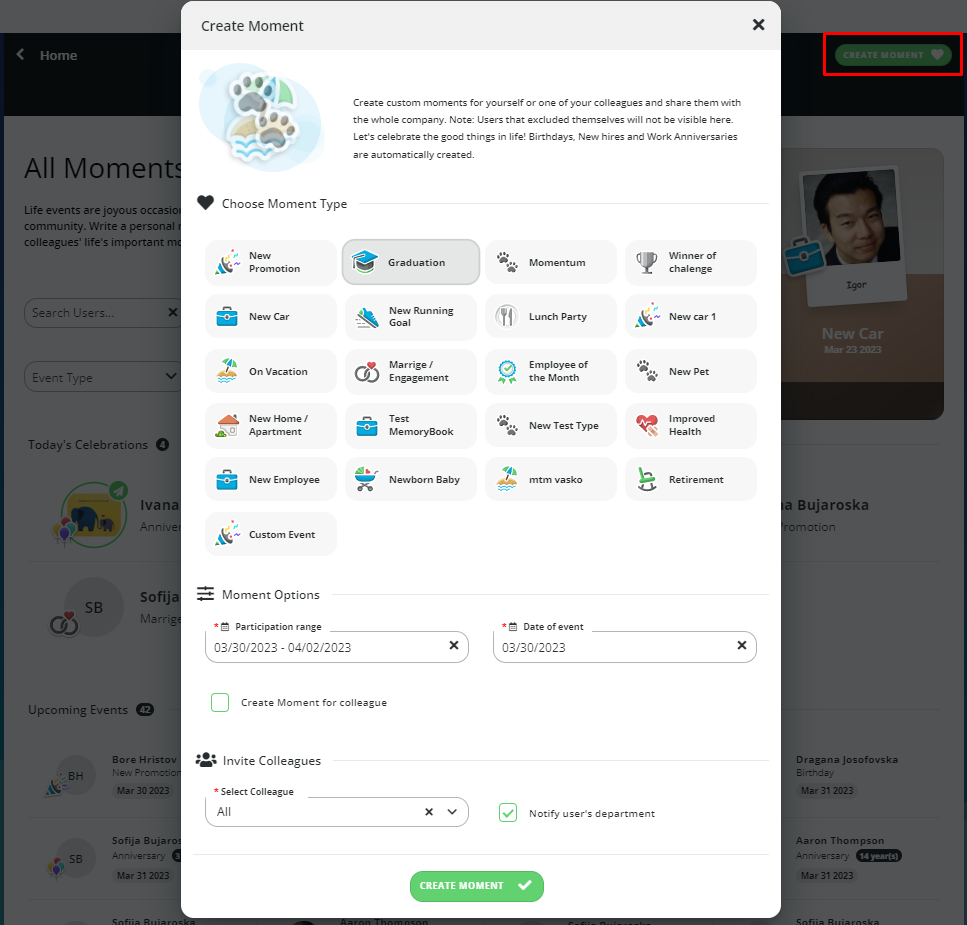
In order to create a new moment or event for yourself or one of your colleagues, first click on the Create Moment button.

Image: JobPts application - Moments that matter create moment
A new pop-up window will be displayed where you will need to fill out the details below:- Choose Moment Type
- Participation range
- Date of event
- Create Moment for colleague
- Invite colleagues- All, Direct reports, Individual Users
- Notify user's department

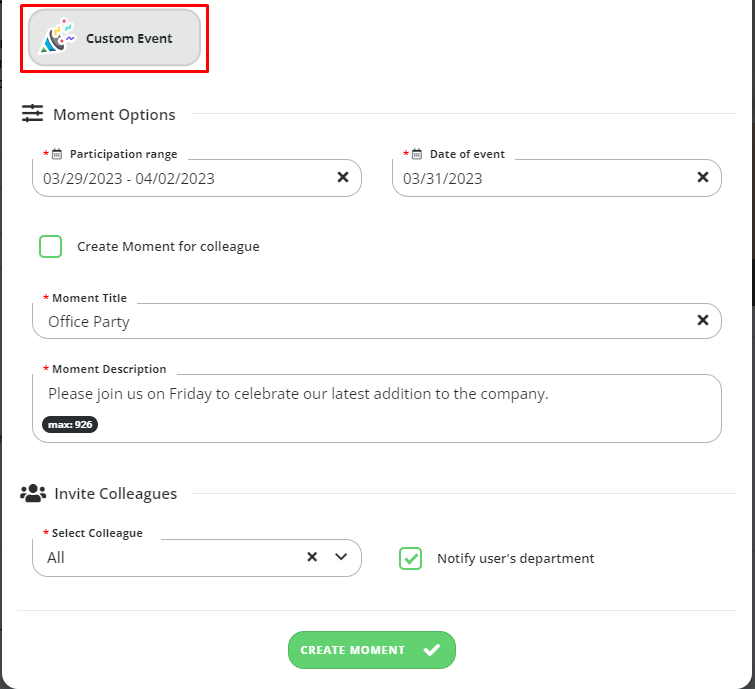
Image: JobPts application - Moments that matter custom event
If you select the option to create a Custom Event, two additional fields will be displayed to fill in
- Moment Title
- Moment Description
If this article left your questions unanswered, please submit a Support Form, and we can clarify this topic.
.png?height=120&name=MicrosoftTeams-image%20(6).png)