The Bulk Recognition feature allows administrators to recognize multiple employees at once—saving time while maintaining a culture of appreciation.
From the Admin Center, administrators can manage everything in one place:
Set a single individual as the sender of the recognition, upload a list of recipients or select them with a simple click, customize the recognize message, assign recognition points and choose from existing recognition programs.
It’s an efficient and impactful way to ensure no great effort goes unnoticed—especially during company-wide initiatives, major events, recognition drives, or times of high engagement.
As an administrator, to send bulk recognitions, first log in to the JobPts homepage, click on the Admin Center in the top-right corner, and then follow the steps below.
Log in to JobPts -> Admin Center -> Programs -> Bulk Recognition
 Image: Bulk Recognition Page
In the fields provided, enter the following information:
Recognition Giver – Enter the name of the person who will appear as the recognition sender.-
Recognition Options – Select from the dropdown the recognition program you want to use for sending the recognitions.
*Note: Based on the selected recognition program, additional fields will appear. For example, if the recognition program includes award reasons, you may need to select one of the reasons when sending an individual recognitions.
- When selecting a monetary award, a field to enter the number of points will appear.
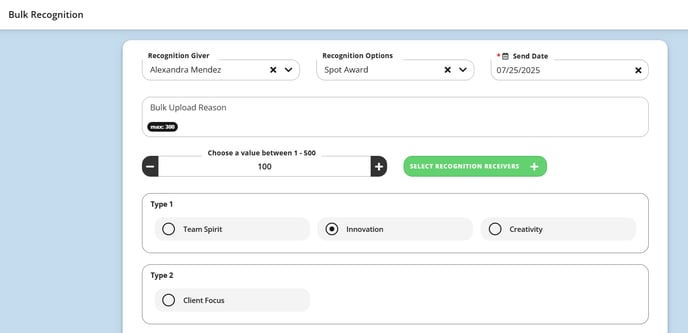
You can only choose from the predefined award amounts configured for the recognition (e.g., 50, 100, 200 points). Only one of the available options can be selected.
If the program has a range, you can insert any value between the minimum and maximum.

Image: Choosing Award Reason & Award Value
- Send Date - Choose the date you want to send the recognition. By default, today’s date is selected.
- Bulk Upload Reason - A text field is provided for the admin to enter the reason for sending the recognitions.
- Include eCard - Choose an eCard to include with the individual recognition.
*Note: If an eCard is connected to an award reason for a specific program and has advanced customization, it will be applied automatically when Include eCard checkbox is selected.
However, if the admin selects the "Override forced eCard" checkbox on the Bulk Recognition page, they will be able to choose a different eCard. - Add Recognize Message for sending individual recognitions.
After filling in the recognition details, the next step is to add the recognition recipients.
To do this, click the green Select Receivers button. This will open a pop-up window where you can search for recipients and save your selection.

Image: Select Receivers
Once you added the users, select Send Recognition to finish the process.


Image: Send Recognition
When you want to send bulk recognitions (dozens or even hundreds at once), start by entering the recognition giver and selecting the recognition program you would like to use. Then, choose the send date, download the Excel template, fill it out with the required information, and upload it to complete the process.
With this approach, the administrator can efficiently send a large number of recognitions at once—while still keeping each one personalized. Each recognition can include:
-
A unique, personalized message.
-
A different monetary award amount (if applicable).
-
A specific award reason tailored to the individual.
*Note: If there is an error in the Excel file, you will be notified with a message like the one shown in the screenshot below.

Image: Error while uploading Excel Message
After the Excel file is validated successfully, select Process Excel to finalize and send the recognitions.
*Note: If the admin selects to send a recognition program that is configured with the SMS option enabled, a verification will be required for the entered mobile number, and the number must be at least 9 digits long.
The process is the same whether you're sending individual recognitions or uploading them via an Excel file.
If this article left your questions unanswered, please submit a Support Form, and we can clarify this topic.
.png?height=120&name=MicrosoftTeams-image%20(6).png)