.png?height=120&name=MicrosoftTeams-image%20(6).png)
Learn how to create and celebrate moments that matter with your colleagues.
In this article:
- Intro and Navigation to Moment that Matters
- Create Moment from a Predefined Event
- Create Moment from a Custom Event
- Edit or Delete a Moment that Matters
To create and celebrate a life event, open the Celebration tile on the home page.
Log in to JobPts -> Celebrations -> Create Moment

Image: JobPts application - Celebration Options
To create a new moment that matters, when you access the “Moments that matter” page, click the "Create Moment" button located in the upper right corner of the screen.
*Note: You will be able to create a moment from the already predefined events in the JobPts Admin Center or create a Custom Event.
This action will open the "Create Moment" modal window.
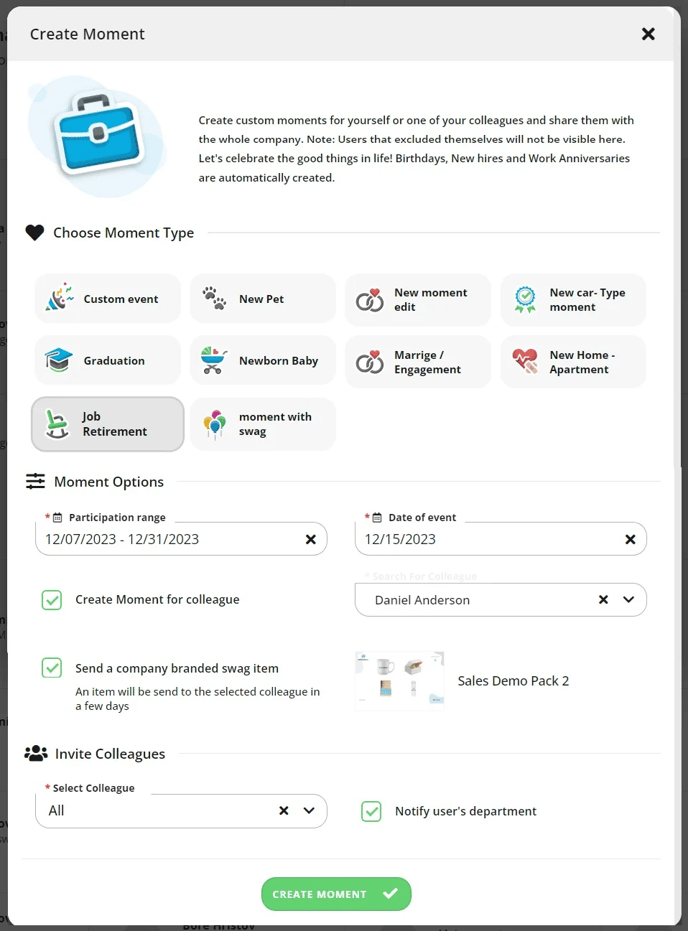
Image: JobPts application - Create Moment modal
Create Moment from a Predefined Event
- Choose moment type - here you can select from the predefined moment types. Select for example the "Newborn Baby" event.
- Moment options
- Participation range - allows you to define the dates in the participations range. The moment will be available for celebration depending on the dates defined in this range. For example, if you define the range to be from 01.12.2025 till 31.12.2025 coworkers will be able to send congratulations for this moment during the month of December
- Date of event - allows you to define the date of the event. This is the date when the event took place. For example, if you are creating an event "Newborn Baby" for the month of December, here define the exact date when the event took place, for instance, the 15th of December. The date of the event must be within the defined participation range
- Create moment for colleague - If you are creating a moment for a colleague, enable the "Create moment for a colleague" checkbox. With this, you will be able to select a colleague for this event. If you want to create a moment for yourself, leave this checkbox empty.

-
- Surprise your colleague - when this option is enabled, the user for whom the moment has been created won't be aware for the moment, however the moment will be visible to all invited users.
- Send a company branded swag item - when this option is enabled the user for whom the moment has been created will receive a company branded item for their special moment in a few days.
- Invite colleagues - Define the colleagues who will be able to send congratulations for this event.
- All
- Country
- Job Title
- Company
- Individual Users
- Org Unit
Note: Depending on how the moment type is created in the Admin Center, the above options will be determined
- Upload Images - optional functionality where you can upload files associated with the moment you are creating or choose your own images. These files will be visible when sending the congratulation.
Click on the Create Moment button
The moment that you have created will be displayed in the "Created by me" tab and you and your colleagues will be able to send congratulations for that moment.
If you have created a moment for yourself, you will not be able to send congratulations to yourself, however other coworkers will be able to send congratulations.
Create Moment from a Custom Event
Select the "Custom event". 
Image: This action will open the "Create New Moment" modal - Custom Event
- Moment options
- Participation range - allows you to define the dates in the participations range. The moment will be available for celebration depending on the dates defined in this range. For example, if you define the range to be from 01.12.2025 till 31.12.2025 coworkers will be able to send congratulations for this moment during the month of December
- Date of event - allows you to define the date of the event. This is the date when the event took place. For example, if you are creating an event "Newborn Baby" for the month of December, here define the exact date when the event took place, for instance, the 15th of December. The date of the event must be within the defined participation range
- Create a moment for a colleague - If you are creating a moment for a colleague, enable the "Create moment for a colleague" checkbox. With this, you will be able to select a colleague for this event. If you want to create a moment for yourself, leave this checkbox empty
- Moment Title - Define the name of the event. For example "New Certificate"
- Upload Images - optional functionality where you can upload files associated with the moment you are creating or choose your own images. These files will be visible on the Overview page of the Company profile.
- Moment Description - Define the description of the event. For example " Congratulations on obtaining the project management certification."
- Invite colleagues - Define the colleagues who will be able to send congratulations on this event.
- All - all colleagues will be able to send congratulations
- Direct Reports - only your direct reports will be able to send congratulations
- Company Structure - depending on what is selected in the Admin Center of JobPoints for the selected moment, the company structure will be determined
If you've selected the option to invite all colleagues to participate in the event, you can additionally checkmark the "Notify user's department" option to notify all of the employees from that department that they can participate in this celebration.

Image: JobPts application - Invite Colleagues
On the screenshot below, we are using the Country filter to add users from selected Countries to participate in the event. The available filters depend on the synced company data and structure.

Image: JobPts application - Invite Colleagues
Click on the Create Moment button
The moment that you have created will be displayed in the "Created by me" tab and you and your colleagues will be able to send congratulations for that moment.
If you have created a moment for yourself, you will not be able to send congratulations to yourself, however other coworkers will be able to send congratulations.

Image: "Created by me" tab - Custom Moment
Edit or Delete a Moment that Matters
The created Moment that Matters can be edited or deleted.

Image: Edit/Delete a Moment that Matters
To edit a moment, open one of the moments you've created in the Created by me tab.
To delete a moment, just click on the Delete Moment button.
*Note: You will not be able to delete a moment that has already been used for congratulations.
If this article left your questions unanswered, please submit a Support Form, and we can clarify this topic.