.png?height=120&name=MicrosoftTeams-image%20(6).png)
This article will help you learn how to set up and manage your landing page settings for optimal performance and user engagement.
This functionality allows administrators to create and customize user landing pages using interactive tiles. With options to choose layouts, copy existing configurations, and add personalized content like social feeds and welcome tiles, this tool makes it easy to build engaging and dynamic home screens within the JobPts application.
To create a new landing page, log in to the Admin Center of the JobPts application and navigate below:
Log in to JobPts -> Admin Center -> Configuration & Branding -> Manage Landing Pages -> Create New Tile Config

Image: Manage Landing Pages
When creating the new landing page, you will be able to choose an existing Home-Screen Layout from the drop-down list. This action will configure the tiles/widgets accordingly to the selected layout. You can save the exact same layout or change some of the tiles/widgets.

Image: Tiles Configuration
On the top part of the screen, you will be presented with the option to Copy values from existing configuration. This means that you can copy a tile configuration from a previously created configuration so you won't have to spend time to create all of the same tiles again.
Social feed
After selecting the social feed option, on the bottom part of the screen you will be presented with generic data on how the posts will be displayed on the social wall. On the right side, you will have all of the interactive tiles displayed.

Image: Social Feed Configuration
If you click on the edit button for the Welcome Tile, you will be presented with two options:
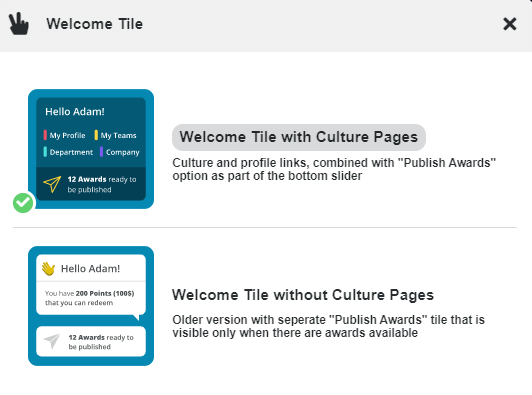
Image: Welcome tile configuration
If you select to have the Welcome Tile with the Culture Pages option, on the home screen you will have direct links to My Profile, My Teams, Department and Company.
To start adding tiles, click on the Add New Grid Item button. You will be presented with the following pop-up window:
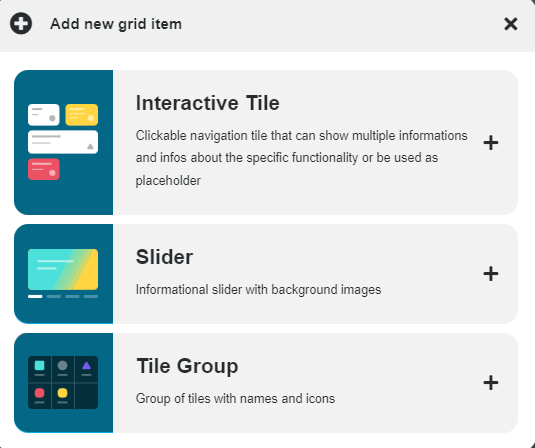
Image: New grid item
By selecting the Interactive Tile option, you will be presented with the following pop-up window:

Image: Tile Configuration - Create/Edit Tile
In the Create/Edit Tile pop-up window, you will find the following fields:
- Tile Type - Select the type of functionality that should be displayed on the tile
- White Background - If this is selected, the background of the tile will be white
- Background Color - Select this to define the color of the tile
- Background Image - Select this to upload an image as a background of the tile
- Tile Icon - Select the tile icon
- Tile Color – Select the tile color
- Tile Text and Icon color - Select the color of the tile text and icon
- Tile Title - Name the tile
- Content Type - Select the type of interactive part for the tile
- Content Name - Add a name for the interactive part of the tile

Image: Slider Configuration - Create/Edit Slider
In the Create/Edit Slider pop-up window, you will find the following fields:
- Slide Type - Select the type of functionality that should be displayed on the tile
- Slide Icon - Select the tile icon
- Total - Counter title - add a description for the total value
- Monthly - Counter title - add a description for the monthly value
By selecting the Tile Group option, you will be presented with the following pop-up window:
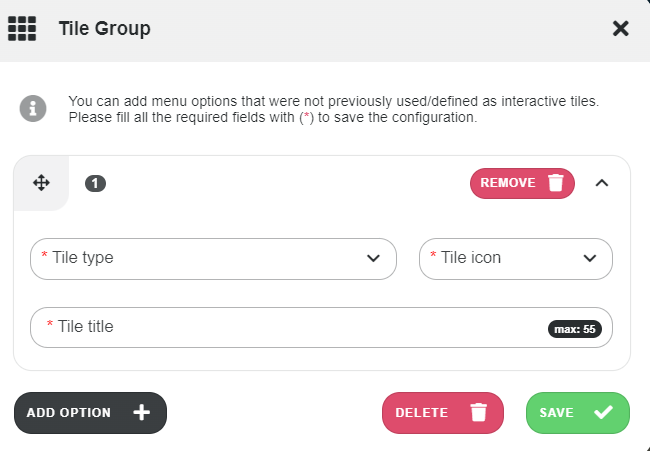
Image: Tile Group configuration
In the Tile Group pop-up window, you will find the following fields:
- Tile Type - Select the type of functionality that should be displayed on the tile
- Tile Icon - Select the tile icon
- Tile Title - Description for the tile
Below is a tile configuration example which contains all of the three options above:

Image: Social Feed configuration example
To archive a tile configuration, click on the Actions button on the tile configuration you want to archive and then click on the Archive button.

Image: Archive Tile Configuration
From the same menu, you can also start editing an existing tile configuration by clicking on the Edit button.
If this article left your questions unanswered, please submit a Support Form, and we can clarify this topic.